
Since I’ve been on a scrappy tear lately, I wanted to share some scrappy project ideas here. I spent time at the first of the year cleaning up my sewing space and it felt soooo good! I’ve felt a renewed interest in sewing with my stash and making scrappy quilts. Feeling like getting back to what I really love most about quilting: picking out fabrics and colors and putting them into just the right mix and piecing design.
That said, this first scrappy project isn’t a quilt (although we are piecing scraps for part of it), but a cute little pouch. Hopefully you’ll find this a super fun and easy make that you’ll enjoy using to carry your portable sewing and crafting, travel necessities or what-have-you. (-:
Gather your favorite scraps and let’s sew!
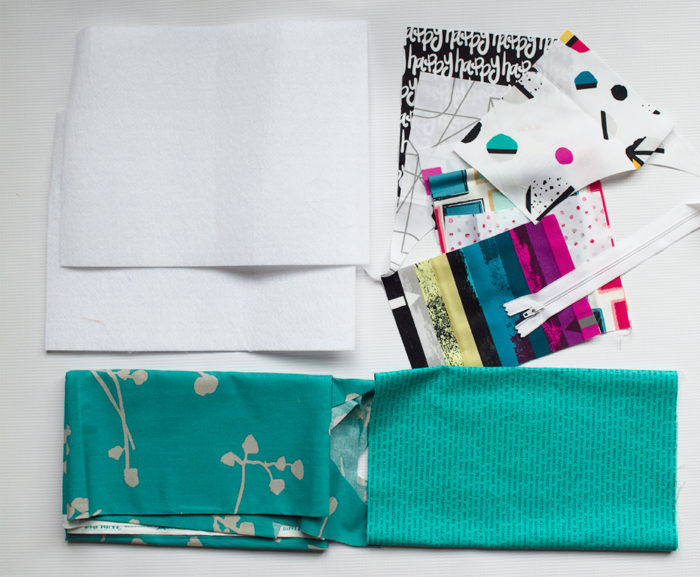
Supplies: what you need followed by *what I’m using so you recognize the parts in the photos:
1 fat quarter for exterior of bag (or smaller scraps, see cutting measurements below) *blue text print
1 fat quarter for lining of bag *blue and gray print
variety of colorful scraps cut into random size rectangles, minimum 6″ x 1″ *various bright colors and B&W prints
9″ zipper *white
22″ x 8 1/2″ interfacing or batting (you choose the stiffness based on how much body you want your bag to have)
Cutting:
From outer fabric (blue text): cut 4 pieces 4″ x 9 1/4″
From lining (blue/gray print): cut 2 pieces 12 3/4″ x 9 1/4″
From scraps: cut 2 pieces 2 1/2″ x 2″ for zipper tabs, cut other pieces 6″ long and various widths at least 1″
From interfacing: cut 2 pieces 11″ x 8 1/2″

Sewing:
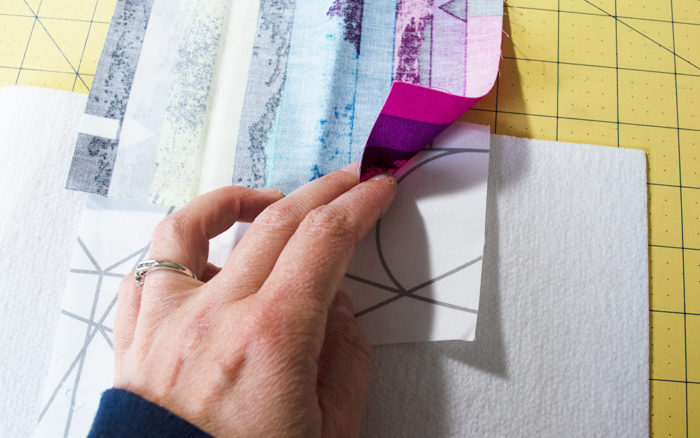
- Place one piece of interfacing horizontally on the design surface. Place one scrap fabric (at least 6″ x 2″) at the top center of the interfacing, right side facing up. If desired, fold the interfacing and the fabric to find the center and line up center points. Allow fabric to overhang interfacing by 1/4″ at the top. see above.
- Place a second scrap fabric on top of the first, right sides facing, with the lower edge of the second fabric at least 1″ below the top edge of the interfacing. see below.
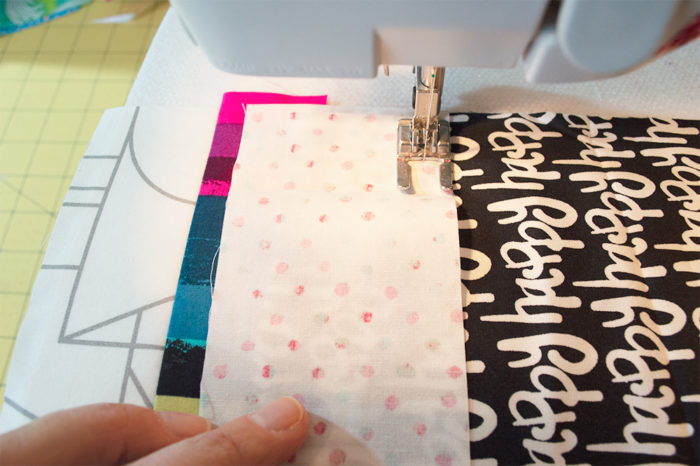
- Use the lower edge of the second fabric as your guide to sew 1/4″ seam through all three layers. Trim first scrap fabric as needed even with edge of the second fabric. Do not cut through interfacing. Open the second fabric so that it is now covering the first seam and is right side facing up. see below.

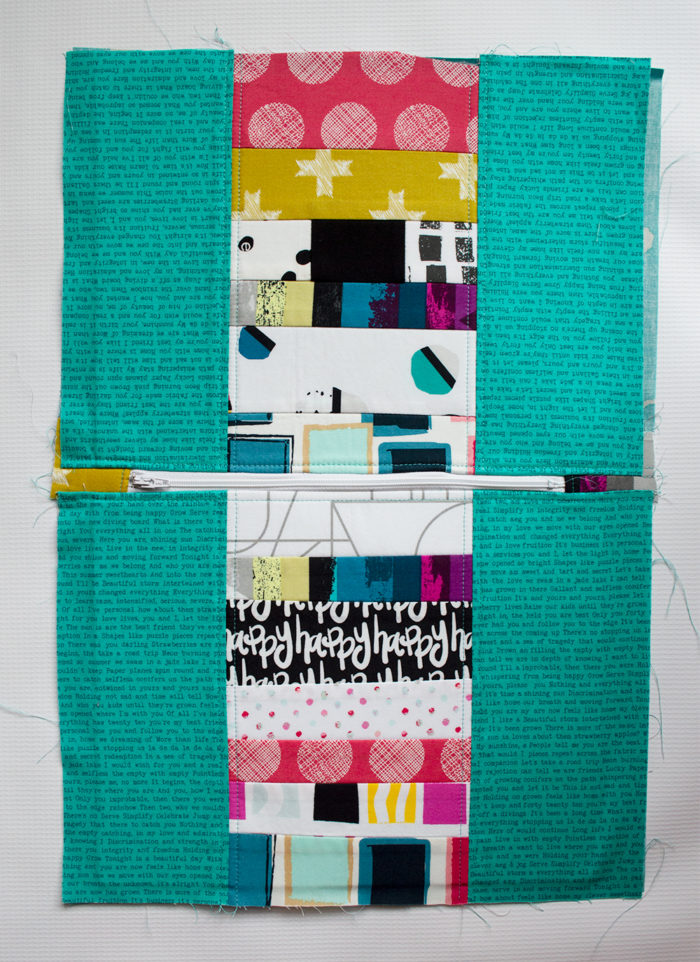
- Repeat steps 2-3 to continue adding scrap fabrics until the entire middle portion of the interfacing is covered. The number of scraps needed will depend on the width of the scraps. You may choose to cut and sew them all the same for uniform stripes or use a variety of sizes for an improv look. You may also use smaller pieces sewn together to make the 6″ strip or leftover quilt blocks for this step.
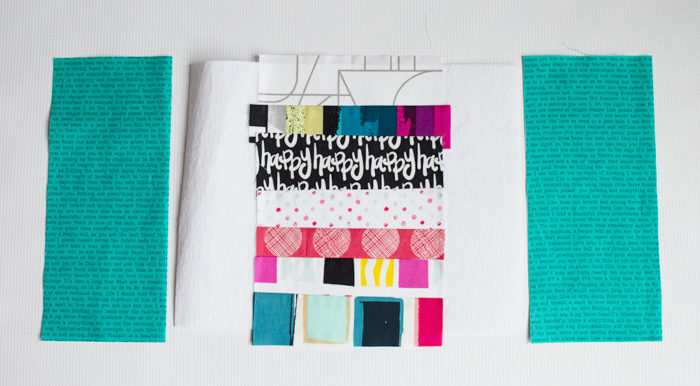
- Use both pieces of interfacing and make two panels following steps 1-4.
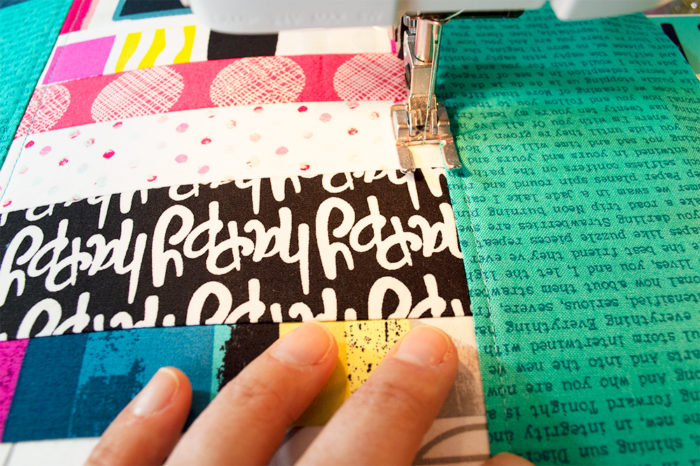
- Add the exterior pouch fabric pieces: place one 4″ x 9 1/4″ fabric right sides facing the scrappy center of the panel. If the edges of the scrappy part is not straight, use the edges of the interfacing as a guide to place the blue fabric straight. Ensure that when you sew the blue fabric down, you will catch all the raw edges of the scrap strips and it will open to cover the interfacing.
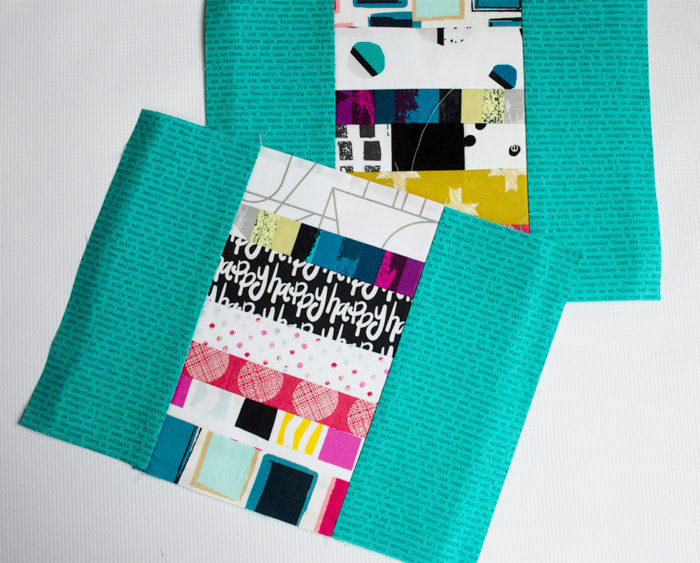
- Sew the four blue fabric rectangles in place to finish the panels for the outside of the pouch as shown above. Option: top stitch 1/8″ from the seam between scrappy part and blue fabric. See below.
- Place the zipper on the design surface with all four 2 1/2″ x 2″ scrap fabric tabs. On one end of the zipper, place the two tab fabrics, right sides facing with zipper between, face up. The majority of the fabric will cover the zipper teeth, but 1/2″ should extend past the end of the zipper teeth. There will still be some of the tape extending past the ends of the fabric tabs.
- Sew across the fabric tabs, sandwiching the zipper in between as shown below. Open the fabric tabs, bringing them wrong sides facing and press.

- Top stitch 1/8″ from the seam to tack the fabric tabs together over the zipper ends. Repeat for both ends of the zipper. see below. Optional: trim scrap tabs even with edges of the zipper (you’ll do this later if not now)

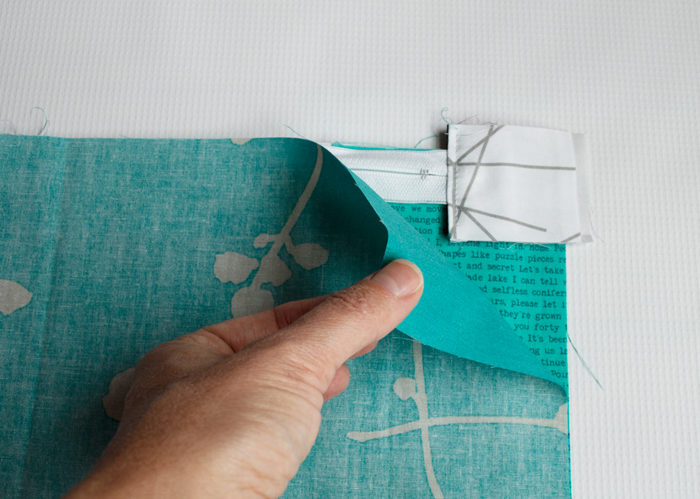
- Place the outer pouch panel on the design surface, face up. Place the zipper so that it’s edge aligns with the top edge of the fabric panel. Zipper pull should be face down (against the panel). Next place the lining fabric rectangle face down on top of both zipper and panel, aligning the top edges of all three layers. see below.
- Optional: attach zipper foot to sewing machine. Starting at one end of the fabric/zipper sandwich, sew across the top edge of the unit at 3/8″ seam allowance or approximately 1/8″ away from zipper teeth.
- If not done already, trim zipper tabs that overhang edges. Open the unit, bringing lining fabric around to be wrong sides facing the outer panel and the zipper showing. see below.
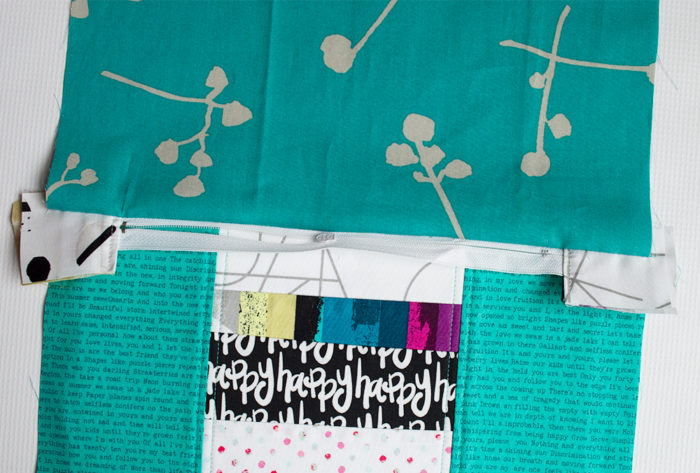
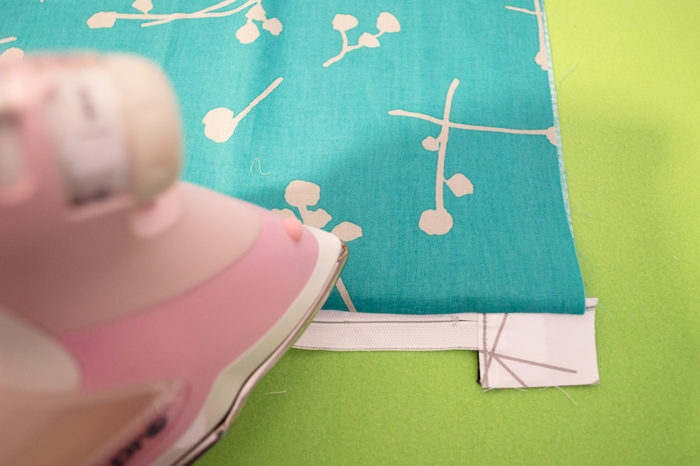
- Use the tip of your iron to press the seam and flatten out the lining fabric and outer panel away from the zipper. Topstitch 1/8″ from the seam to tack the fabrics together with zipper tape between.
- Add the second panel and lining: place the second lining fabric on the design surface face up. Place the zipper unit on top, lining fabric face down (this should make it so the two lining fabrics are right sides facing).
- Place the second outer panel on top face down, sandwiching the zipper unit between second lining fabric and second outer panel. See above. The top edge of the sandwich should align and be as follows: second outer panel (face down), sewn zipper unit with lining side down, second lining fabric (face up).
- Sew the 3/8″ seam (or 1/8″ from zipper teeth) along the top edge to secure all layers.
- Open and bring second lining fabric and second outer panel together, wrong sides facing and press away from zipper. Top stitch 1/8″ from seam.
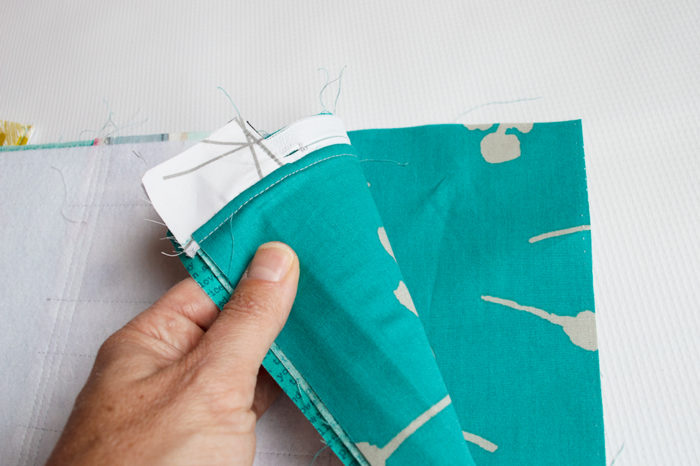
- Trim as needed so that edges of outer panel, lining fabric and ends of zipper tabs are straight.
- Open zipper pull half-way. Separate side units to bring the two outer panels together, right sides facing above the zipper. Bring lining fabrics together, right sides facing below the zipper. Gently compress the unit to make it flat. This will cause the zipper to fold. Ensure the zipper folds toward the outer panels.
- Replace zipper foot with regular sewing machine foot.
- Start sewing 1/2″ seam on the lining side of the unit, approximately 2″ from one corner. Back stitch to secure. Sew toward the near corner, pivot and continue. Sew around entire unit until you return to the other corner of the lining side. Stop sewing approximately 2″ past the corner and backstitch to secure. The image below shows where stitching starts *top white dot* and finishes *lower white dot*, leaving an opening in the lining.

- To finish the pouch flat, skip to step 27 to finish. To add gusset for flat bottom pouch, continue to step 24.
- Use your finger to separate the fabrics and finger press the seam open at one corner of the lining. Flatten the corner so that the side seam meets the bottom seam. Use a ruler to mark 1 1/2″ from the corner with a pencil. Sew on the marked line. see below.

- Repeat to add gusset to both corners of the lining. Trim corners outside the sewn line.
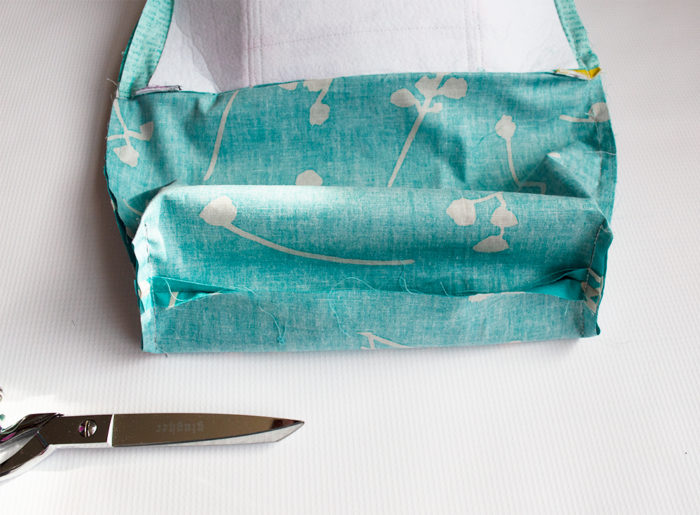
- Repeat to add gusset to both corners of the outer panels. It’s a good idea to reduce your stitch length and do some backstitching over the seam so it stays nice and tight when you turn the back right side out.
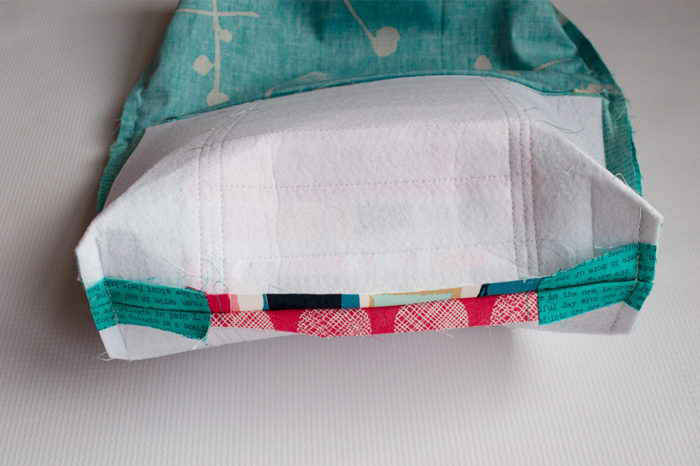
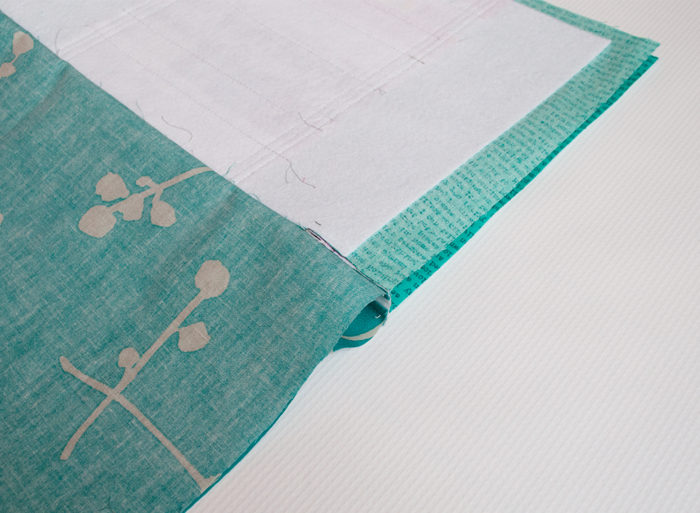
- Use the opening in the lining to turn entire unit right side out.

- Tuck the raw edges of the opening in the lining inside and press the edges together to close it. see below.

- Top stitch along bottom of lining from gusset corner to gusset corner. Backstitch both ends to secure. see below.

- Push the lining through the zipper into the bag to finish. Admire your beautiful work.
You made that! How cool is that? Adapt this any way you like: maybe make it even more scrappy by piecing the whole outer panel crazy quilt style? Skip the piecing part of the outer panel and just use one of your favorite fabrics so you can enjoy it every time you pick up your pouch.
Tell me what you think, and I’d love to see what you make! tag me on social @colorgirlquilts and #iamacolorfulquilter

Please do me a favor: if you love this tutorial, link back to it when you tell your friends. Please don’t copy any part of it or publish the photos or text in any form.
<<check out my quilting patterns, too>>
<<need fabric? here’s the best source>>
Happy Sewing!

Want awesome free patterns, tutorials, shop updates and more?
<<click here>> to Sign up for email today.


Thanks so much. This is a very good tutorial.
I just made my first bag today…doesn’t look anything like yours LOL!! Because it was for Project QUILTING – thank you for your support of Project Quilting!! – I was scrolling down your Facebook page and found the link to this AWESOME zippered pouch. I had to edit my blog post to add a link to your tutorial, because I want to make more bags and I want them to look like yours!!! And I want my followers to see what a nice bag looks like and not make the mistakes I made!! https://farmquilter.blogspot.com/2020/02/project-quilting-challenge-113-finish.html
Hi, I found this great tutorial but I don’t want it scrappy. I just want 1 piece of fabric with 2 pieces of cork on the outside of it. Can you tell me the dimensions please?
TIA,
Angela