Welcome to my stop on the tutorial blog hop organized by Amy Smart of Diary of a Quilter! She has a new book out called, “Fabulously Fast Quilts”, and had the great idea of collecting tutorials from quilters on their own little tricks to make quilting easier or faster.
My trick has to do with paper piecing. Now, most are probably thinking, “how can you possibly make paper piecing anything close to ‘fast’?” If you dislike wasting a lot of fabric with paper piecing, unpicking seams, or just find it confusing to place the fabric correctly, Read on.
If you are new to paper piecing, visit my Tutorial on Basic PP to get started.
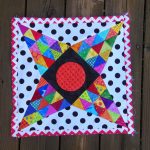
For the tutorial, I designed this simple star block. I chose to use lots of triangles, because they demonstrate why this trick works so well.
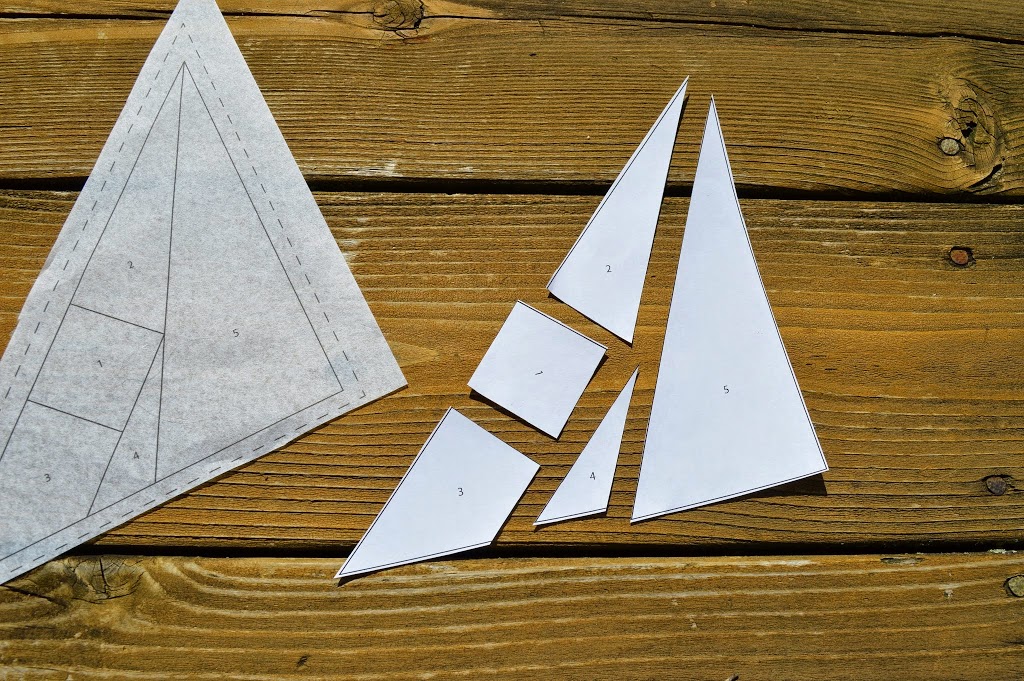
If you are using my Rocky Road Star template, you will need to make two copies of the template page (for total of four templates) on your preferred foundation paper (I use a june taylor product called “perfect piecing”, available at Joann’s. It goes nicely through my printer, is see-through, and easy to tear away).
Plus, make one extra copy on regular paper.
Cut out your piecing templates (that’s mine above on the left). Cut out the extra template you copied on regular paper, but cut out all the pieces, right on the lines (shown above, right).
These pieces are going to work like templates for cutting your fabric.
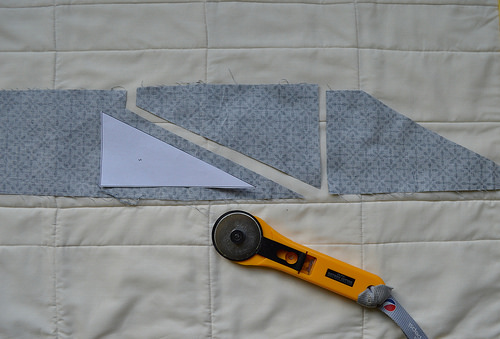
This is very important: ALWAYS cut on the back (wrong side) of your fabric but keep the template (paper shape) RIGHT side up (so you can see the number).
Place the template face up on the back of the fabric and use your rotary cutter to cut out the shape, adding 1/2″ on all sides.
Make sure that you cut the angles the same, making your fabric shape
the same as the template only larger.
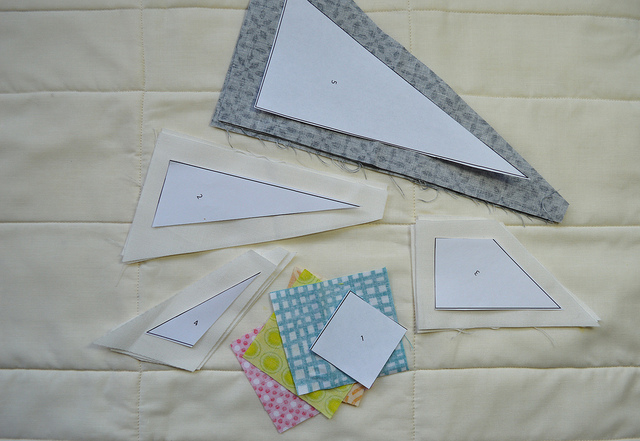
Once you have all the shapes cut for one block, you are ready to sew! (for my block, you need four of each numbered shape, #1 is the color square, #2, 3, 4 are white, #5 is gray)
Now you need your piecing templates: turn the template over so you are looking at the back of it (this is when it is nice to use paper you can see through).
Place your colored square over the space on the template with the 1 as shown:
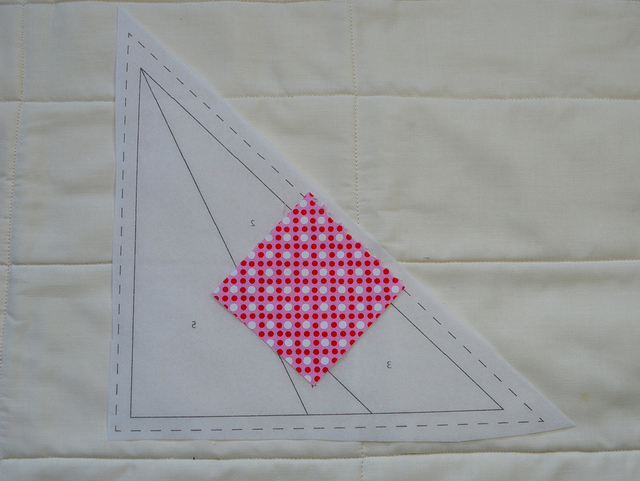
Remember: at this point you are looking at the front of the fabric, and the back of the template.
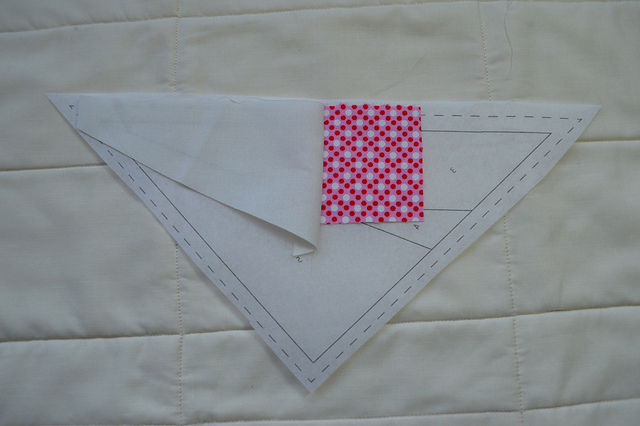
Next, place a #2 white triangle, right sides facing with the #1 square. Orient the triangle as you would in normal piecing: edge to edge, with the angle set up so that when opened and pressed, it will cover the 2 space on the template:

Once the #1 and #2 fabrics are ready, turn the template over, holding (or pinning) the fabrics to keep them in place:
Now you are looking at the right side of the template and the wrong side of the colored square (#1) fabric.
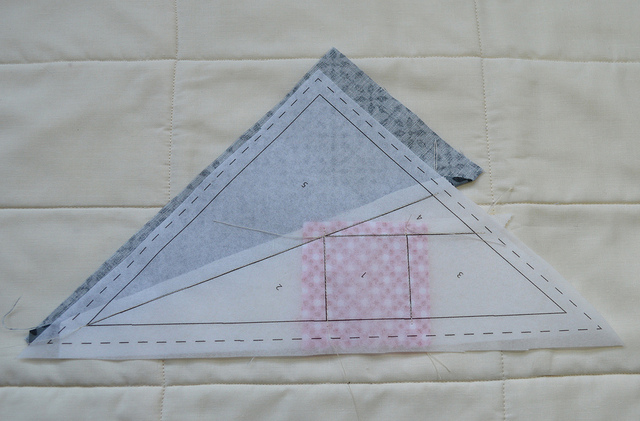
Sew on the line between shapes 1 and 2 like this:
Turn the template back over to the fabric side, open the white triangle, and press the seam:
Keep adding the pieces in order until you have the template covered and it looks like this:
I promise, I didn’t do any extra trimming or anything to pretty up these photos. My cutting trick makes even difficult shapes like these long triangles come together with less wasted fabric, less seam ripping and less standing on your head!
Trim your template on the dotted outer lines. Make four of these (I made pink, yellow, blue, and green). When you sew them together, you get this star:
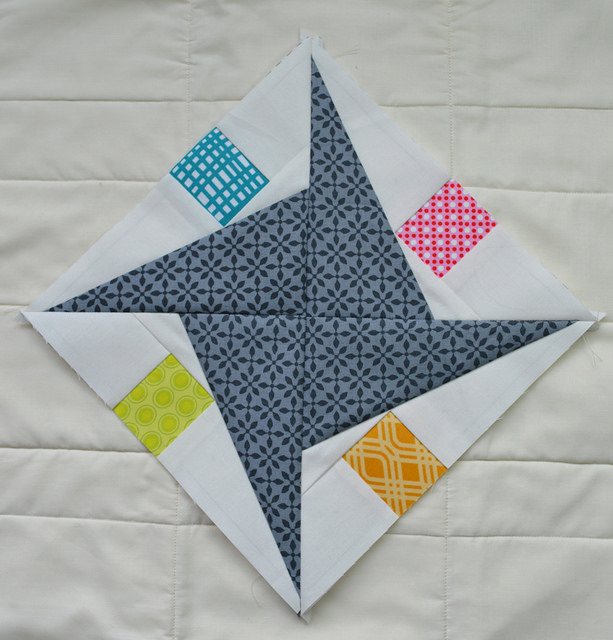
Four of these stars makes the image shown at the top of this post. Here is an illustration of what a whole quilt might look like:
Thanks for tuning in! I hope you found this helpful, maybe even convinced you to take another look at paper piecing.
Be sure and visit the other stops
on the tour for more tips and tricks, and congratulate Amy on her new book!
Sharon
Get free patterns, tutorials and Color Girl news right to your inbox!


I’ve bookmarked your tutorial. Thanks for all the tips.
I’m scared to death of paper piecing! Thanks so much for your tutorial! I will be giving it a try 🙂
Thank you for such a great tutorial. It is very helpful and will definitely make paper-piecing a lot easier and ‘friendlier’!
Wonderful quick tip! I wish I’d seen it before my stressful adventures in paper piecing for last month’s bee blocks! I wouldn’t have had so many close encounters with my seam ripper.
This is a great tip, thank you! PP has never been a favorite of mine, partly because of the waste (fabric is more than twice as expensive over here in The Netherlands than it is in the US, because of transportation, importduties and a salestax of 21% (!) ) so this is great!
Sharon that makes perfect sense. I am going to try I tone of these days. The thing in PP that I hated was guessing the shaped piece to put on and getting all these bigger small scraps that I can’t throw away just yet that were all biasy and odd. I can see how the time to make the paper cuts would save lots of headache later. Thanks.
fabulous cant wait to try this tip!! printed your star template!! I hated the waste when paper piecing but hated even more when I skimped and it didn’t work (err seam ripping) Thanks!!
Exactly! What you said!
Thank you so much for the free pattern. I love FPP and can’t wait to try out your method for less waste.
Best tutorial I have seen! This will really help me. I am also going to get that see-through paper!
Thank you!
This is genius! I’ve always been frustrated by the waste and my efforts not to waste have often resulted in unsewing! Thanks!
I love the block and I love the tute. Thank you for sharing!
What a fabulous block! Thanks for the tips 🙂
U rock! I have been studying paper piecing at work and don’t get it…..this may be the ticket and the block is adorable!!!!! I can see a baby quilt in the future.
Thanks for the awesome tips and the gorgeous pattern!!!
LOVE! So much I downloaded it, made half a block (never PP anything in my life) and now am off to buy some perfect piecing paper (I used typing paper LOL)! You might have a convert on your hands!! I also linked to your post from my blog post today 🙂 Let me know if that is not OK.
Wow, spectacular and thanks for the tips and pattern!!
Thanks so much for posting this! I’m fairly new to paper piecing, so your tips (and pattern) are priceless!!
I’ve NEVER been able to “get” this. It’s scary to me now since I’ve tried several times and had epic fails….your tutorial is great!
Great idea! Waste has always been my complaint about paper piecing, but this will help with that.
Hey thanks for this! It’ll come in handy real soon for me!
Love this tutorial! Thanks for posting it up.
What a lovely block! I’ve never tried paper piecing but when I do, I’ll be back to check out your tips again 🙂
I love this method! I use it all the time, and everything works out beautifully. Except when I forget to put the pattern face up on the wrong side of the fabric. Oops 🙂
Sharon, could you tell me what size this lovely star block is? I couldn’t see anywhere in the description on Craftsy where it mentioned a size. I might have missed it but I’m hoping this is the size I’m looking for as I love the look of this star and I am a PP addict. 😉
Marsha
Thanks so much for this post. I’ve made a few paper pieced blocks in the last couple of months, loved it but struggled with the angled pieces. Just made another one using this method and Ta Da!! – SUCCESS!! Genius and so simple. Thanks again.
Love your post. I’ve been paper piecing for years, but Never thought of the tip to cut out the shapes from regular paper and then use them to cut out 1/2 inch outside them for your fabric pieces. Love it and will be using it the next time I paper piece. Thanks!! Hugs, H in Healdsburg
Thank you. It is one thing to read about this technique but much better to see it in action.
Just about to cut into my Alison Glass and try paper piecing – so glad I saw your IG post today and visited this tutorial……. Priceless ????
Thank you so much for this tip!!! I just started a king size paper pieced Sea Swept (storm a sea var) and with the first unit I was considering a different method because of the waste (and the fabric flopping around). This is exactly the guidance I needed. Blessings <3
Nice photo shoot taken, that could be helpful for other peoples. But need to photo retouching work done for professional looks.
Thanks for the great tutorial. I’m making my own foundation pattern & was having a problem working out the seam lines on a piece. Looking at your tutorial gave me an “AHA!” moment & now I know how to fix it. Thanks heaps from New Zealand.